To tint your hair, start by selecting a color that suits your style. Apply the tint evenly, following the instructions on the product. Allow it to process for the recommended time, then rinse thoroughly.
Understanding how to tint your hair is essential for anyone looking to enhance their appearance or express their individuality. Incorrect application or choice of color can lead to undesirable results, potentially damaging hair or resulting in uneven color.
This guide covers the essential steps for tinting hair, including color selection, application techniques, and aftercare tips to ensure a vibrant and lasting result.
What is hair tinting and how does it differ from dyeing?
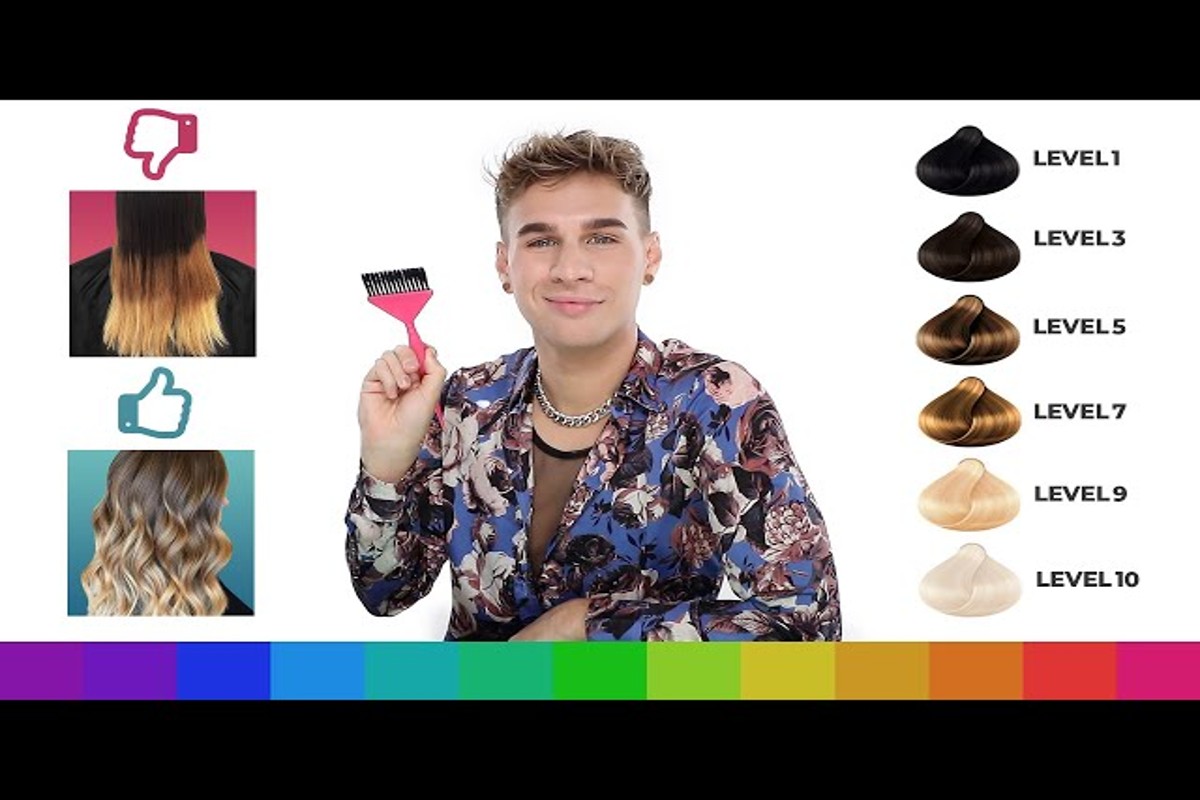
Hair tinting is a process that involves applying a semi-permanent color to the hair, while dyeing typically refers to the use of permanent color. Tinting usually deposits color without significantly altering the hair’s natural pigment, resulting in a more subtle change. In contrast, dyeing can involve bleaching and altering the hair’s structure for a more dramatic transformation.
Hair tinting products often contain a lower concentration of ammonia or may be ammonia-free, making them less damaging to the hair than permanent dyes. This allows for a gentler approach to changing hair color, which is particularly beneficial for those who want to experiment without committing to a long-lasting change. Tinting is ideal for enhancing natural color, covering gray hair, or adding a hint of vibrancy.
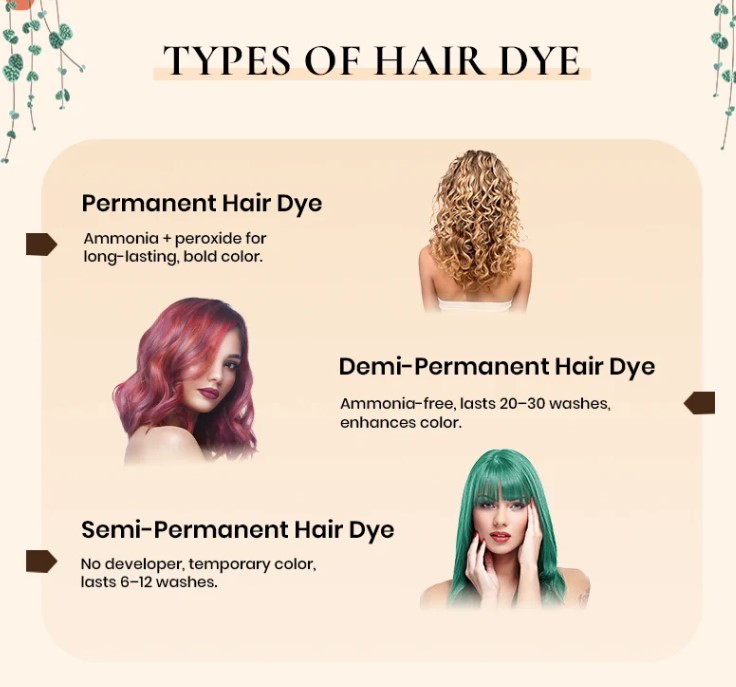
- Semi-Permanent Tints: These wash out over time, typically lasting 4 to 12 shampoos.
- Demi-Permanent Dyes: These offer longer-lasting results, usually lasting 12 to 24 shampoos, and can penetrate the hair shaft more effectively.
- Permanent Dyes: These require a chemical process to alter the hair’s natural pigment and can last until the hair grows out or is cut off.
Choosing between tinting and dyeing depends on the desired outcome and hair condition. Tinting is less damaging and allows for versatility, making it suitable for those new to hair color. Conversely, dyeing is better for achieving bold colors or significant changes but requires more commitment and care.
Expert Tip: When considering how to tint your hair, assess your hair type and condition. For damaged or previously colored hair, opt for a semi-permanent tint to avoid further stress and maintain hair health.
How long does hair tint last compared to hair dye?
Hair tint typically lasts between 4 to 6 weeks, while traditional permanent hair dye can last anywhere from 6 to 12 weeks or longer. The longevity of each option depends on several factors, including hair type, maintenance routine, and the specific product used.
Hair tint is a semi-permanent coloring option that deposits color onto the hair without penetrating the hair shaft deeply. This means that it gradually washes out with each shampoo, making it a suitable choice for those who prefer less commitment. Factors that can influence the duration of hair tint include the frequency of washing, the use of sulfate-free shampoos, and exposure to sunlight. Additionally, hair texture plays a role; porous hair may absorb tint differently, causing it to fade faster.
In contrast, hair dye, particularly permanent dye, contains stronger chemicals that open the hair cuticle and allow color to penetrate more deeply. This results in a more enduring color that withstands numerous washes. However, the fading of hair dye can also be affected by similar factors, such as hair care practices, environmental conditions, and the initial shade chosen. Darker colors may last longer than lighter shades, which tend to fade more quickly.
- Longevity: Hair tint: 4-6 weeks; Permanent dye: 6-12 weeks or more.
- Application: Hair tint deposits color; Permanent dye penetrates hair shaft.
- Fading Factors: Both are affected by washing frequency, hair type, and sun exposure.
Using products designed for color-treated hair can significantly extend the life of both hair tints and dyes. Regular conditioning treatments can also help maintain vibrancy, especially for semi-permanent colors. Consider your lifestyle and maintenance preferences when choosing between tint and dye.
What are the best practices for applying hair tint at home?
To achieve even coverage and minimize mistakes when tinting hair at home, follow specific best practices. These tips ensure the tint adheres properly and results in a uniform color. Proper preparation and technique are essential for a successful outcome.
Before applying hair tint, conduct a patch test to check for allergic reactions. This step is crucial, as it helps identify any potential sensitivity to the dye. Additionally, ensure that your hair is clean and dry, having been washed at least 24-48 hours prior to tinting. This allows the scalp’s natural oils to protect it during the coloring process.
- Section your hair: Divide hair into manageable sections using clips. This facilitates even application and ensures that no strands are missed.
- Use the right tools: Invest in a tint brush and bowl for precision. A comb can help distribute the tint evenly, while gloves protect your hands from stains.
- Apply strategically: Start at the roots and work your way down to the tips. This technique ensures that the areas requiring the most color receive it first, allowing for a consistent result.
- Monitor processing time: Follow the manufacturer’s instructions regarding the duration the tint should remain on the hair. Check the color periodically to achieve the desired shade without over-processing.
- Rinse thoroughly: After the processing time, rinse hair with lukewarm water until it runs clear. Follow with a color-safe conditioner to lock in moisture and enhance shine.
Expert-level application involves knowing your hair’s porosity and adjusting the tinting process accordingly. For porous hair, consider using a lower developer strength to prevent excessive absorption, which can lead to darker results than intended.
How much does it cost to tint your hair at a salon?
The cost to tint your hair at a salon typically ranges from $50 to $150, depending on various factors. More complex services, such as balayage or highlights, may increase the price significantly, sometimes exceeding $200. Regional differences and salon reputation also play a major role in determining the final cost.
Several factors influence the price of hair tinting services. The most significant include:
- Location: Salons in urban areas or upscale neighborhoods often charge higher prices than those in rural locations.
- Stylist experience: A seasoned stylist with a strong reputation may charge more for their expertise, while newer stylists may offer lower rates to attract clients.
- Service complexity: Simple all-over color is usually less expensive than techniques like balayage, ombre, or specialty colors that require more time and skill.
- Product quality: Salons that use premium hair products or organic dyes may charge more, reflecting the higher cost of materials.
- Additional services: Extras such as a haircut, deep conditioning treatment, or styling can add to the overall cost of the appointment.
Clients should also consider the potential need for touch-ups or maintenance, which can incur additional costs over time. Many salons offer package deals or discounts for returning customers, which can help manage overall expenses.
When selecting a salon for hair tinting, prioritize quality over cost. Investing in a skilled stylist can yield better results and minimize the risk of damage to the hair.
How do you prepare your hair for tinting?
Preparing your hair for tinting involves several key steps to ensure the best results and minimize damage. These steps include washing and conditioning your hair properly, as well as ensuring that it is in good health before applying any tint. Follow these guidelines to get your hair ready for the tinting process.
- Wash your hair: Use a gentle shampoo to cleanse your hair and remove any product buildup. Avoid using conditioner at this stage, as it can create a barrier that inhibits the tint from adhering properly.
- Assess your hair’s health: Check for any signs of damage, such as split ends or excessive dryness. If your hair is damaged, consider a deep conditioning treatment a few days prior to tinting.
- Skip the conditioner: Do not condition your hair immediately before tinting. Conditioning can interfere with the tint’s ability to penetrate the hair shaft, reducing its effectiveness.
- Perform a patch test: A day before tinting, conduct a patch test on your skin to check for any allergic reactions to the dye. This step is essential for your safety.
- Dry your hair: Allow your hair to air dry completely before applying the tint. Wet hair can dilute the dye and lead to uneven results.
Following these preparation steps will help ensure that your hair is ready for the tinting process. Proper preparation can lead to a more vibrant color and healthier hair overall.
Expert Tip: For optimal results, consider using a clarifying shampoo a few days before tinting to remove any remaining product buildup, but be sure to follow up with a moisturizing treatment to maintain hair health. This helps create a clean canvas for the tint to adhere to effectively.
Can you tint your hair without bleach?
Yes, you can tint your hair without bleach. Many semi-permanent and demi-permanent hair dyes are designed to add color without the need for bleach, allowing for a gentler process.
For example, consider a person with naturally dark brown hair who wants to achieve a rich burgundy tint. Instead of using bleach, they can opt for a semi-permanent hair dye specifically formulated for dark hair. This type of dye contains pigments that can adhere to the hair shaft, subtly altering the color. The result will be a vibrant hue that enhances their natural color rather than completely changing it.
The effectiveness of tinting without bleach depends on the natural color and condition of the hair. Darker hair may not achieve the same intensity as lighter hair, but using a color specifically designed for darker shades can still yield satisfying results. Additionally, the longevity of the color may vary; semi-permanent dyes typically last between 4 to 12 washes, depending on hair type and care routine.
When choosing a hair tint, consider the desired outcome and select a product that complements your base color. For those looking for a more subtle change, shades that are close to their natural color may provide a more seamless look.
Expert Tip: To enhance the vibrancy of your tint, use a color-safe shampoo and conditioner. This helps maintain the color and prolongs the life of the tint, ensuring the results remain fresh and vibrant longer.
What is the process of tinting hair step by step?
Tinting hair involves a series of well-defined steps to achieve the desired color. The process includes preparation, application, and aftercare. Each step is essential for ensuring optimal results and maintaining hair health.
- Gather your materials: Before starting, collect all necessary supplies, including hair dye, gloves, a mixing bowl, a brush for application, and a comb. Having everything on hand will streamline the process.
- Conduct a patch test: Apply a small amount of dye to a discreet area of skin 48 hours prior to full application. This step ensures you do not have an allergic reaction to the dye.
- Prepare your hair: Wash your hair 24 to 48 hours before tinting, leaving natural oils intact to protect the scalp. Avoid using conditioner, as it can create a barrier against dye absorption.
- Mix the dye: Follow the instructions on the dye package to mix the color and developer in a bowl. Ensure the mixture is smooth and well-blended for even application.
- Section your hair: Divide your hair into four sections using clips for easier access during application. This helps ensure that the dye reaches every strand uniformly.
- Apply the dye: Starting from the roots, use a brush to apply the dye evenly, working your way down to the tips. Ensure full coverage, but avoid saturating the scalp.
- Set the timer: Once the dye is applied, follow the recommended processing time on the product instructions. This is crucial for achieving the desired shade.
- Rinse thoroughly: After the processing time, rinse your hair with lukewarm water until the water runs clear. This removes excess dye while preserving your new color.
- Condition your hair: Apply a deep conditioner or the conditioner provided in the dye kit to restore moisture. Leave it in for a few minutes before rinsing.
- Dry and style: Gently towel-dry your hair and proceed with your usual styling routine. Avoid heat styling for the first 48 hours to allow the color to settle.
For best results, choose a dye that complements your natural hair color and texture. Additionally, consider consulting a professional stylist if you are uncertain about the process or if you are attempting a significant color change.
Choosing the Right Hair Tint Color for Your Skin Tone
Selecting the right hair tint color is essential for achieving a harmonious look that enhances your natural beauty. Understanding your skin tone and undertones can significantly impact your choice, ensuring the tint complements rather than clashes with your complexion.

Identifying Your Skin Undertones
Skin undertones are categorized into three main types: warm, cool, and neutral. Recognizing your undertone is the first step in selecting a hair tint that naturally complements your features.
- Warm undertones: These are characterized by yellow, peach, or golden hues. People with warm undertones often have a golden or olive complexion.
- Cool undertones: These appear as pink, red, or blue hues. Individuals with cool undertones typically have fair skin that burns easily or deep skin with a pinkish tint.
- Neutral undertones: This category includes a mix of warm and cool tones. Neutral undertones allow for flexibility in color choices, as both warm and cool shades can be flattering.
Matching Hair Tint Shades to Skin Tones
Once you identify your undertone, the next step is to match it with appropriate hair tint shades:
- Warm tones: Opt for hair colors with golden, honey, or copper bases. Shades like caramel, golden blonde, and warm chestnut can enhance your natural glow.
- Cool tones: Choose colors with ash, platinum, or blue bases. Cool shades such as icy blonde, ashy brown, or deep burgundy will complement your skin.
- Neutral tones: You can experiment with a wider range of colors. Both warm and cool shades, such as soft beige or rich chocolate, can work well.
Considering Seasonal Changes and Personal Style
Hair tint choices can also be influenced by seasonal changes in your complexion. For example, skin tones may become lighter in winter and warmer in summer. Additionally, personal style plays a role. Consider how vibrant or subtle you want your hair color to be, aligning it with your wardrobe and lifestyle. This ensures a cohesive look that resonates with your personality.
Using Color Swatches and Online Tools
To refine your color selection, utilize color swatches available at beauty supply stores or use online color visualization tools. These resources allow you to see how different shades might look against your skin tone. Many brands offer virtual try-on features that can help visualize potential outcomes, making the decision process more informed.
Common misconceptions about hair tinting often include the belief that darker shades universally suit all skin tones. This is inaccurate; lighter or warmer shades can sometimes enhance features more effectively than darker options, depending on the individual’s undertone.
Additionally, many assume that once a hair color is chosen, it should remain unchanged. In reality, experimenting with shades that complement seasonal skin tone variations can refresh your appearance. Regular adjustments can prevent a dated look and maintain vibrancy.
To apply this information effectively, start by determining your skin undertone. Experiment with different swatches and online tools to visualize potential hair colors. Consider how seasonal changes and your style preferences may influence your choice. Finally, consult with a professional stylist if uncertain, to ensure the selected tint aligns perfectly with your unique features.
Common Mistakes to Avoid When Tinting Your Hair
When tinting hair, avoiding common mistakes can significantly impact the final result. This section highlights frequent errors that can lead to unsatisfactory outcomes, ensuring a smoother tinting experience.
:max_bytes(150000):strip_icc()/never-do-these-things-when-you-dye-your-hair-at-home-GettyImages-471258645-8302251770da4fe39ac1051df056622f.jpg)
Skipping the Patch Test
Conducting a patch test before applying hair tint is essential. This test helps identify potential allergic reactions to the dye. To perform a patch test, apply a small amount of the dye solution to a discreet area of skin, such as behind the ear or on the inner elbow, and wait 48 hours. If any irritation or allergic reaction occurs, do not proceed with the tinting process.
Not Following Timing Instructions
Timing is critical in achieving the desired hair color. Each hair tint product comes with specific instructions regarding application and development time. Failing to adhere to these guidelines can result in uneven color or an undesired shade. For optimal results, follow these steps:
- Read the instructions on the product packaging carefully.
- Set a timer to monitor the development time accurately.
- Check the color periodically, especially for lighter shades.
Overlooking Hair Condition
The condition of the hair plays a significant role in how well the tint absorbs. Damaged or overly dry hair may not hold color effectively, leading to patchy results. Before tinting, assess your hair’s health and consider the following:
- Use a deep conditioning treatment a week prior to tinting.
- Avoid tinting if hair is excessively damaged or brittle.
- Consider a professional consultation if unsure about hair condition.
Neglecting Proper Aftercare
Aftercare significantly influences the longevity of hair color. Neglecting to use color-safe shampoos, conditioners, and treatments can lead to rapid fading. Implement these aftercare steps to maintain color vibrancy:
- Use sulfate-free shampoos designed for colored hair.
- Limit heat styling, which can accelerate color fading.
- Protect hair from sun exposure with hats or UV protectants.
Many individuals assume that once the dye is applied, the process is complete. However, understanding the importance of ongoing maintenance can extend the life of the color significantly. Hair porosity, for example, can affect how well the hair retains color, which is often overlooked in standard guides.
To ensure a successful tinting experience, take the following actionable steps:
- Always perform a patch test before dyeing your hair.
- Adhere strictly to the timing instructions provided with the product.
- Assess and improve hair condition prior to tinting.
- Invest in proper aftercare products designed for colored hair.
Aftercare Tips for Long-Lasting Hair Tint Results
Maintaining the vibrancy of your hair tint is essential for sustaining its fresh appearance and avoiding premature fading. This section outlines effective aftercare strategies that will enhance the longevity of your hair color.

Use Sulfate-Free Shampoos
Traditional shampoos often contain sulfates, which can strip hair of its natural oils and color. Opt for sulfate-free shampoos specifically formulated for color-treated hair. These shampoos help cleanse the hair without compromising the integrity of the tint, allowing for a longer-lasting color.
Incorporate Deep Conditioning Treatments
Regular deep conditioning treatments are vital for maintaining moisture and health in color-treated hair. Aim for a deep conditioning treatment at least once a week. Look for products that contain nourishing ingredients such as argan oil, shea butter, or keratin, which can help restore vitality and shine to your hair.
Limit Sun Exposure and Heat Styling
Excessive sun exposure and heat styling can significantly contribute to color fading. To protect your hair from UV rays, consider wearing a hat or using a UV protectant spray when outdoors. Additionally, limit the use of heat styling tools like blow dryers, curling irons, and straighteners. When heat styling is necessary, always use a heat protectant spray to minimize damage.
Schedule Regular Touch-Ups
As hair grows, the roots may become visible, and the tint may start to fade. Schedule touch-ups every 4-6 weeks to maintain a consistent color throughout your hair. This not only keeps your hair looking vibrant but also helps prevent uneven color distribution.
Additional Aftercare Considerations
- Keep showers cool: Hot water can open the hair cuticle, allowing color to escape.
- Avoid chlorinated water: If swimming, use a swim cap or apply a leave-in conditioner to protect your hair.
- Limit washing frequency: Washing hair too often can lead to faster fading; aim for 2-3 times a week.
Many believe that the type of hair dye used does not affect aftercare needs. However, the formulation of the dye—whether semi-permanent, permanent, or temporary—can influence how you should care for your hair post-tinting. For instance, semi-permanent dyes often require different maintenance compared to more robust permanent options. Always read the instructions specific to the hair tint used and adjust your aftercare routine accordingly.
To effectively implement these aftercare tips, follow this actionable plan:
- Choose a sulfate-free shampoo for your next wash.
- Set a reminder for weekly deep conditioning treatments.
- Limit heat styling and invest in a UV protectant for outdoor activities.
- Mark your calendar for touch-up appointments every 4-6 weeks.
By adhering to these guidelines, you will ensure that your hair remains vibrant and healthy long after the initial tinting process.
Comparing Temporary vs. Semi-Permanent Hair Tints
This section provides a detailed comparison between temporary and semi-permanent hair tints, essential for selecting the right product according to individual needs and preferences.
Definitions and Uses
Temporary hair tints are designed to last for a short duration, typically one wash to a few washes, depending on the product. They coat the hair shaft without penetrating the hair cuticle, making them ideal for those seeking a quick color change or experimenting with vibrant shades. Commonly used for special occasions or festivals, these tints are easily applied and removed.
Semi-permanent hair tints, on the other hand, provide longer-lasting color, generally persisting for about 4 to 12 washes. These tints penetrate the hair shaft slightly, allowing for a more robust color payoff. They are suitable for individuals looking for a more enduring change without the commitment of permanent dyes, often used to enhance natural color or cover grays.
Pros and Cons
- Temporary Hair Tints Pros:
- Easy application and removal.
- Wide variety of bold colors available.
- No commitment, perfect for short-term use.
- Temporary Hair Tints Cons:
- Color fades quickly.
- May not provide full gray coverage.
- Can stain skin or clothing if not applied carefully.
- Semi-Permanent Hair Tints Pros:
- Longer-lasting color compared to temporary options.
- Less damaging than permanent dyes.
- Good for enhancing natural tones or covering grays.
- Semi-Permanent Hair Tints Cons:
- More commitment than temporary tints.
- Requires more careful application to avoid uneven results.
- Color may gradually fade but can leave a subtle tint.
Longevity and Maintenance
Temporary hair tints are designed for short-term use, often lasting just one wash. Maintenance involves minimal effort, as users can simply wash their hair to remove the color. In contrast, semi-permanent tints demand a bit more care. While they last longer, fading can occur due to factors such as washing frequency, water temperature, and hair care products. To prolong the life of semi-permanent color, consider using sulfate-free shampoos and cool water during washes.
Recommendations Based on Outcomes and Commitment
Choosing between temporary and semi-permanent tints largely depends on the desired outcome and commitment level:
- For a bold, short-term change or special events, opt for temporary hair tints.
- For a subtle, yet longer-lasting effect that enhances natural color, choose semi-permanent hair tints.
- Evaluate lifestyle factors, such as frequency of hair washing and willingness to maintain color, to determine the best fit.
Nuance and Common Misconceptions
A prevalent misconception is that temporary tints are only suitable for children or casual use. In reality, many adults use these products for creative expression or to match seasonal trends. Additionally, some believe that semi-permanent tints can completely cover gray hair; while they can reduce the visibility of grays, results may vary based on the hair’s natural color and texture. Expert guidance can help navigate these nuances to achieve the desired results.
Practical Application
To effectively choose the right tint:
- Assess the occasion and desired duration of color.
- Consider your hair type and existing color for compatibility.
- Follow product instructions for the best results, ensuring a patch test is conducted to avoid adverse reactions.
Frequently Asked Questions
What is hair tinting and how does it differ from dyeing?
Hair tinting involves applying a semi-permanent color that enhances natural hair color or adds subtle shades. Unlike permanent dyeing, tinting does not penetrate the hair shaft as deeply, resulting in a less drastic change.
How long does hair tint last compared to hair dye?
Hair tint typically lasts between 4 to 6 weeks, depending on hair type and maintenance. In contrast, permanent hair dye can last several weeks longer, often until new hair growth occurs.
What are the best practices for applying hair tint at home?
For optimal results, perform a patch test before application and ensure hair is clean and dry. Follow the product instructions carefully and use gloves to protect your hands from staining.
How much does it cost to tint your hair at a salon?
The cost of hair tinting at a salon can range from $50 to $150, depending on the salon’s location and the stylist’s expertise. Additional services, like a haircut or treatment, may increase the total price.
How do you prepare your hair for tinting?
Prepare your hair by washing it with a clarifying shampoo to remove product buildup, but avoid conditioning right before tinting. Dry hair should be free of oils and products to ensure even color application.
Can you tint your hair without bleach?
Yes, you can tint your hair without bleach, especially if you are enhancing your natural color or going darker. However, achieving lighter shades typically requires bleaching first to lift the existing color.
What is the process of tinting hair step by step?
The hair tinting process generally involves preparing the hair, mixing the tint according to instructions, applying it evenly, and allowing it to set for the recommended time. Finally, rinse the hair thoroughly and apply a conditioner to lock in moisture.
Final Thoughts on how to tint your hair
Successfully tinting your hair requires a careful selection of color, an understanding of the application process, and a commitment to aftercare. By recognizing the nuances between tinting and dyeing, individuals can achieve vibrant, personalized results that enhance their natural beauty without the long-term commitment of traditional hair dye.
To embark on your hair tinting journey, choose a tint that complements your skin tone and conduct a patch test to ensure compatibility before applying the product. This precautionary step minimizes the risk of adverse reactions and sets the stage for a successful tinting experience.
Mastering hair tinting not only allows for creative expression but also empowers individuals to take control of their appearance with confidence and flair.
Leave a Reply